
Flip Those Books is an Amazon Associate. As an Amazon Associate we earn from qualifying purchases. We may also earn commissions if you purchase products from retailers after clicking on a link from our site.
I’ve prepared more than 10,000 books for Amazon FBA since I started my full-time FBA bookstore. After lots of experimentation, I’ve finally got the whole process down to a pretty exact science.
This step-by-step guide will tell you exactly how to prepare, list, and send your books Amazon’s FBA warehouses.
- Get the necessary equipment
- Set up your book processing station
- Configure your listing software
- Sort books by condition and remove flaws
- List your books
- Submit your batch information and tape your shipping labels to your boxes
- Send your boxes to Amazon
- Relax
Step 1: Get the Necessary Equipment.
While there are many tasks you can accomplish with nothing but your hands, preparing books for Amazon FBA is not one of them.
Here’s a list of all the equipment you’ll need to properly prep your books. If you don’t have any of this stuff, click on the links to view them on Amazon.
- Home Depot moving boxes (get the small size)
- Thermal label printer (I use the Dymo LabelWriter 450 Turbo)
- USB barcode scanner (I use the Esky USB Automatic Barcode Scanner)
- Removable barcode labels (I use these removable type 30334 Dymo-compatible labels)
- Digital shipping scale (I use the Accuteck ShipPro)
- Shipping tape (I use Scotch heavy duty shipping tape)
- Shipping tape dispenser (I use the Scotch Box Sealing Tape Dispenser)
- Label peelers (I use Scotty Peelers)
- Cleaning wipes (I use Clorox wipes)
- Erasers (I use Pilot foam erasers)
Step 2: Set up your book processing station.
Before you start scanning books into your listing software, you’ll need to clear some space on your desk (or wherever you’re processing) and set up the necessary hardware.
This is pretty simple. Your prep location needs to meet a few easy requirements:
- You’ll need enough table space for your computer, mouse, label printer, USB barcode scanner, label peelers, and erasers.
- You’ll need access to a power outlet to charge your computer and plug in the label printer.
- You should have a small garbage can nearby to throw label papers and stickers into. If you don’t have one, just set up one of your Home Depot boxes and throw stuff into there.
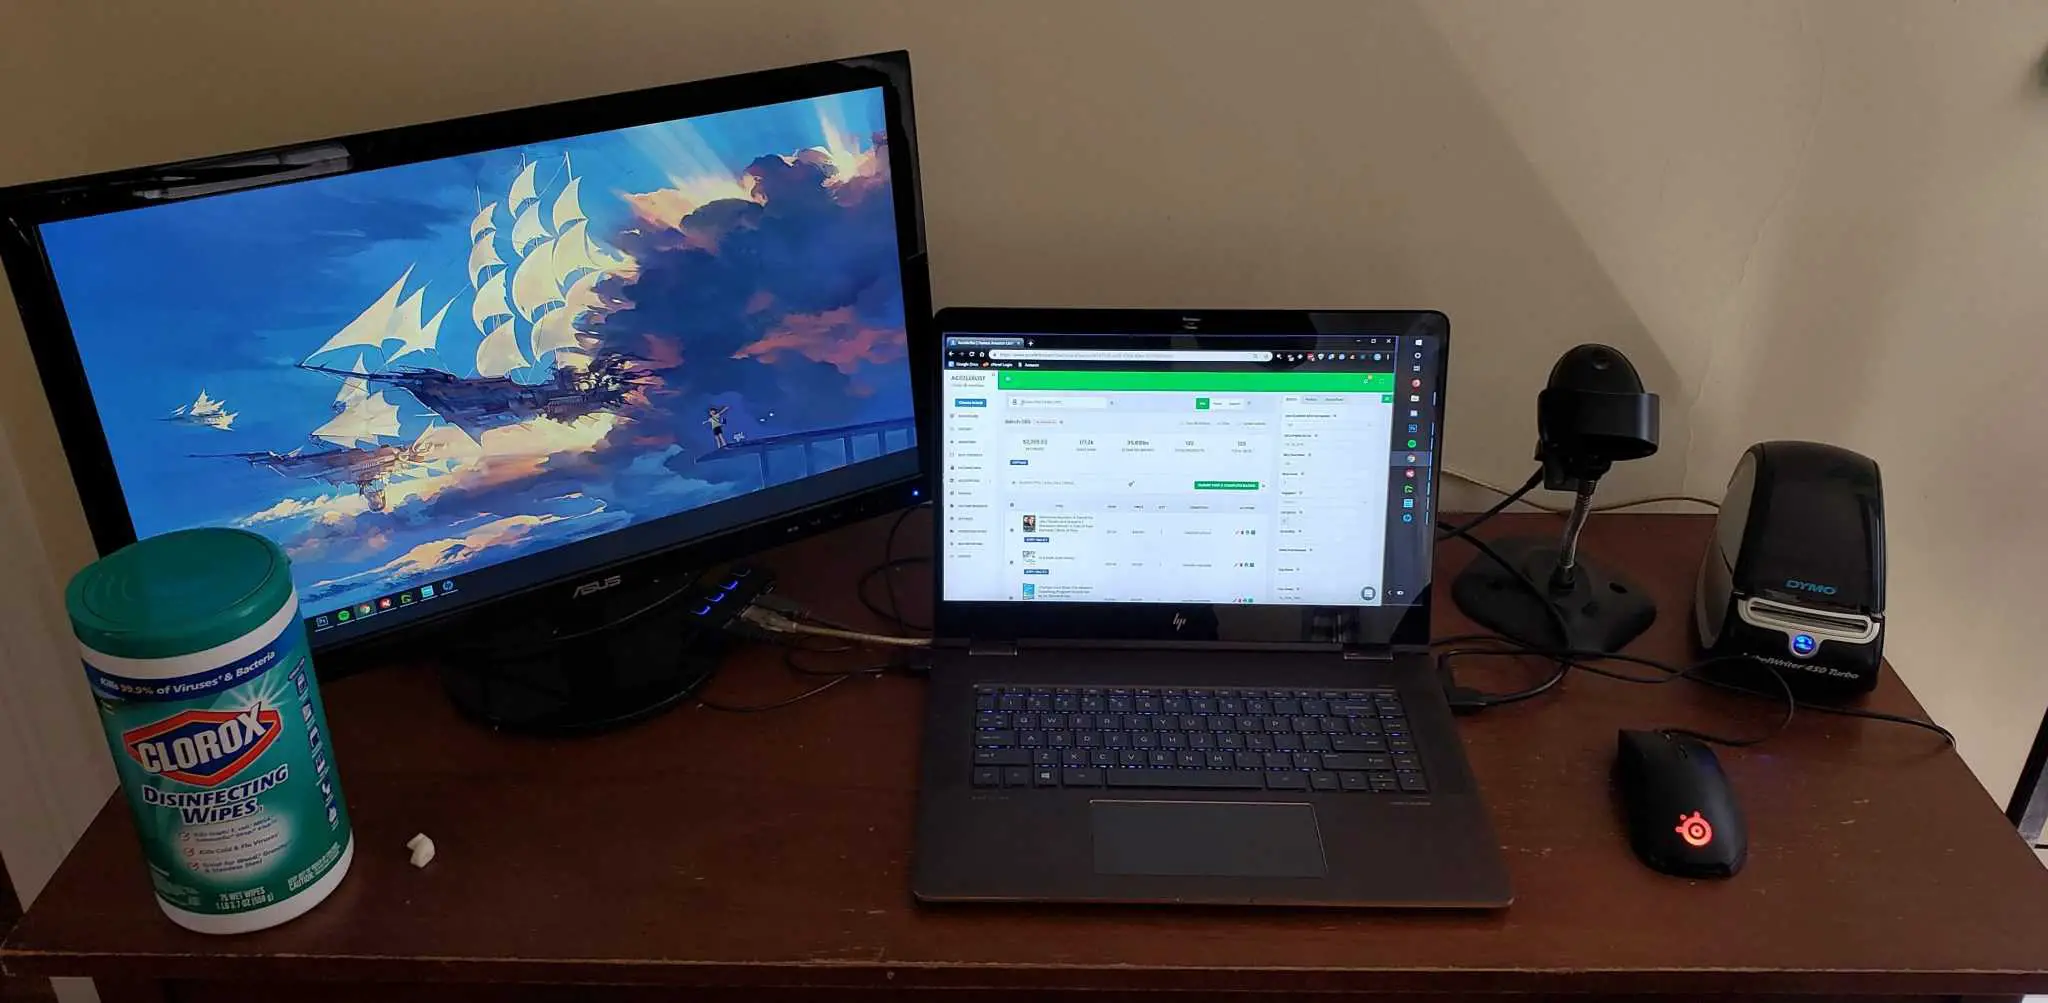
Once you’ve chosen your location and placed everything, you need to plug your mouse, label printer, and USB barcode scanner into your computer.
If you don’t have enough USB ports for all of these, you can use a USB hub to make everything fit.
Here’s what my prep station looks like, so you can compare:
Step 3: Configure your listing software.
Now that your listing station is set up, you’ll need to set up your listing software.
You can use any listing software you like. I use Accelerlist, so the rest of this tutorial will be showing you how to use Accelerlist to prepare your books for Amazon FBA.
If you don’t have listing software, I recommend you sign up for the Accelerlist 14-day free trial and give it a try.
I’m not going to cover how to sign up for Accelerlist or connect it to Amazon ‒ the software does a great job of guiding you through that once you’ve made an account. I’ll assume all of that is done from here on out.
Configuring Accelerlist: A step-by-step walkthrough
The first thing you’re going to want to do when you log in is click on “condition notes” near the bottom of the left sidebar.
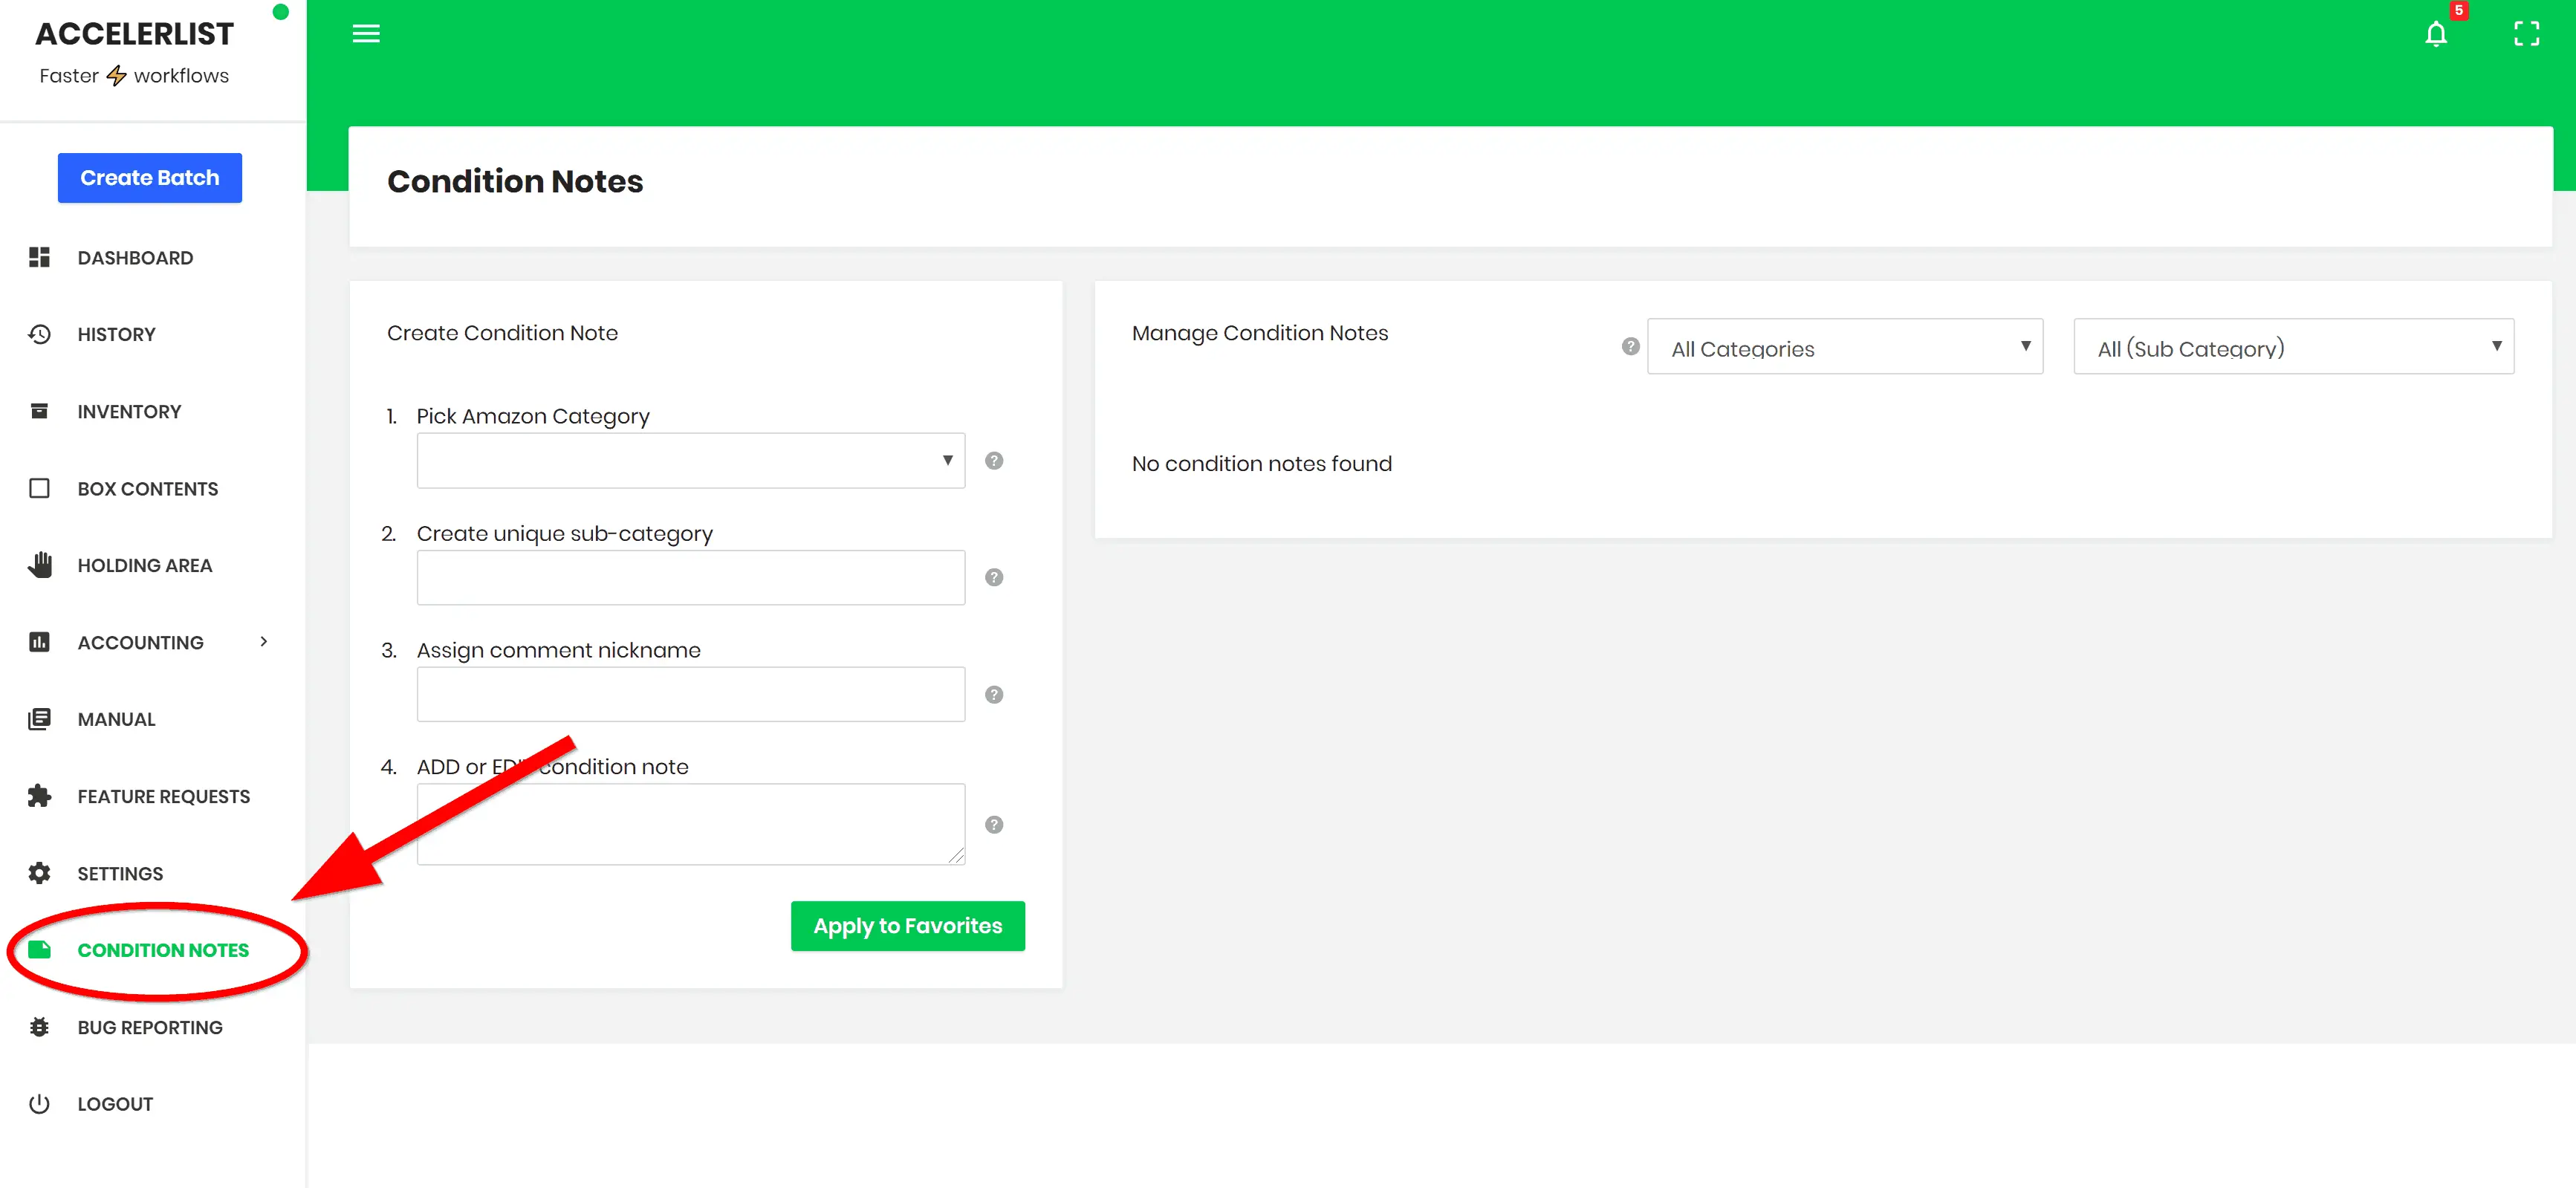
Now we’re going to make 4 separate condition notes: one each for Acceptable, Good, Very Good, and Like New conditions. I’ll show you how to make the first one, then you can repeat the process for the other three.
- Select “Books” from the “Pick Amazon Category” dropdown menu.
- Type “Acceptable” in the unique sub-category and comment nickname fields.
- Add your Acceptable condition note in the ADD or EDIT condition note field.
- Click “Apply to Favorites”
- Repeat steps 1-4 for each condition
If you don’t have condition notes yet, feel free to use mine:
Acceptable condition note: “Fast shipping + tracking ID with Amazon Prime and a 100% hassle-free guaranteed return policy. This is a solid used copy. It may have damage to the cover or spine, wrinkling from water exposure, or excessive writing/highlighting. Despite its flaws, all pages are present and completely readable. “
Good condition note: “A solid used copy. Fast shipping + tracking ID with Amazon Prime and a 100% hassle-free guaranteed return policy.”
Very Good condition note: This book is in pretty great shape. No writing/highlighting. Has minimal shelf wear. Fast shipping + tracking ID with Amazon Prime and a 100% hassle-free guaranteed return policy.”
Like New condition note: “This book is in excellent shape. Essentially a new book, with only extremely minimal shelf wear. Fast shipping + tracking ID with Amazon Prime and a 100% hassle-free guaranteed return policy.”
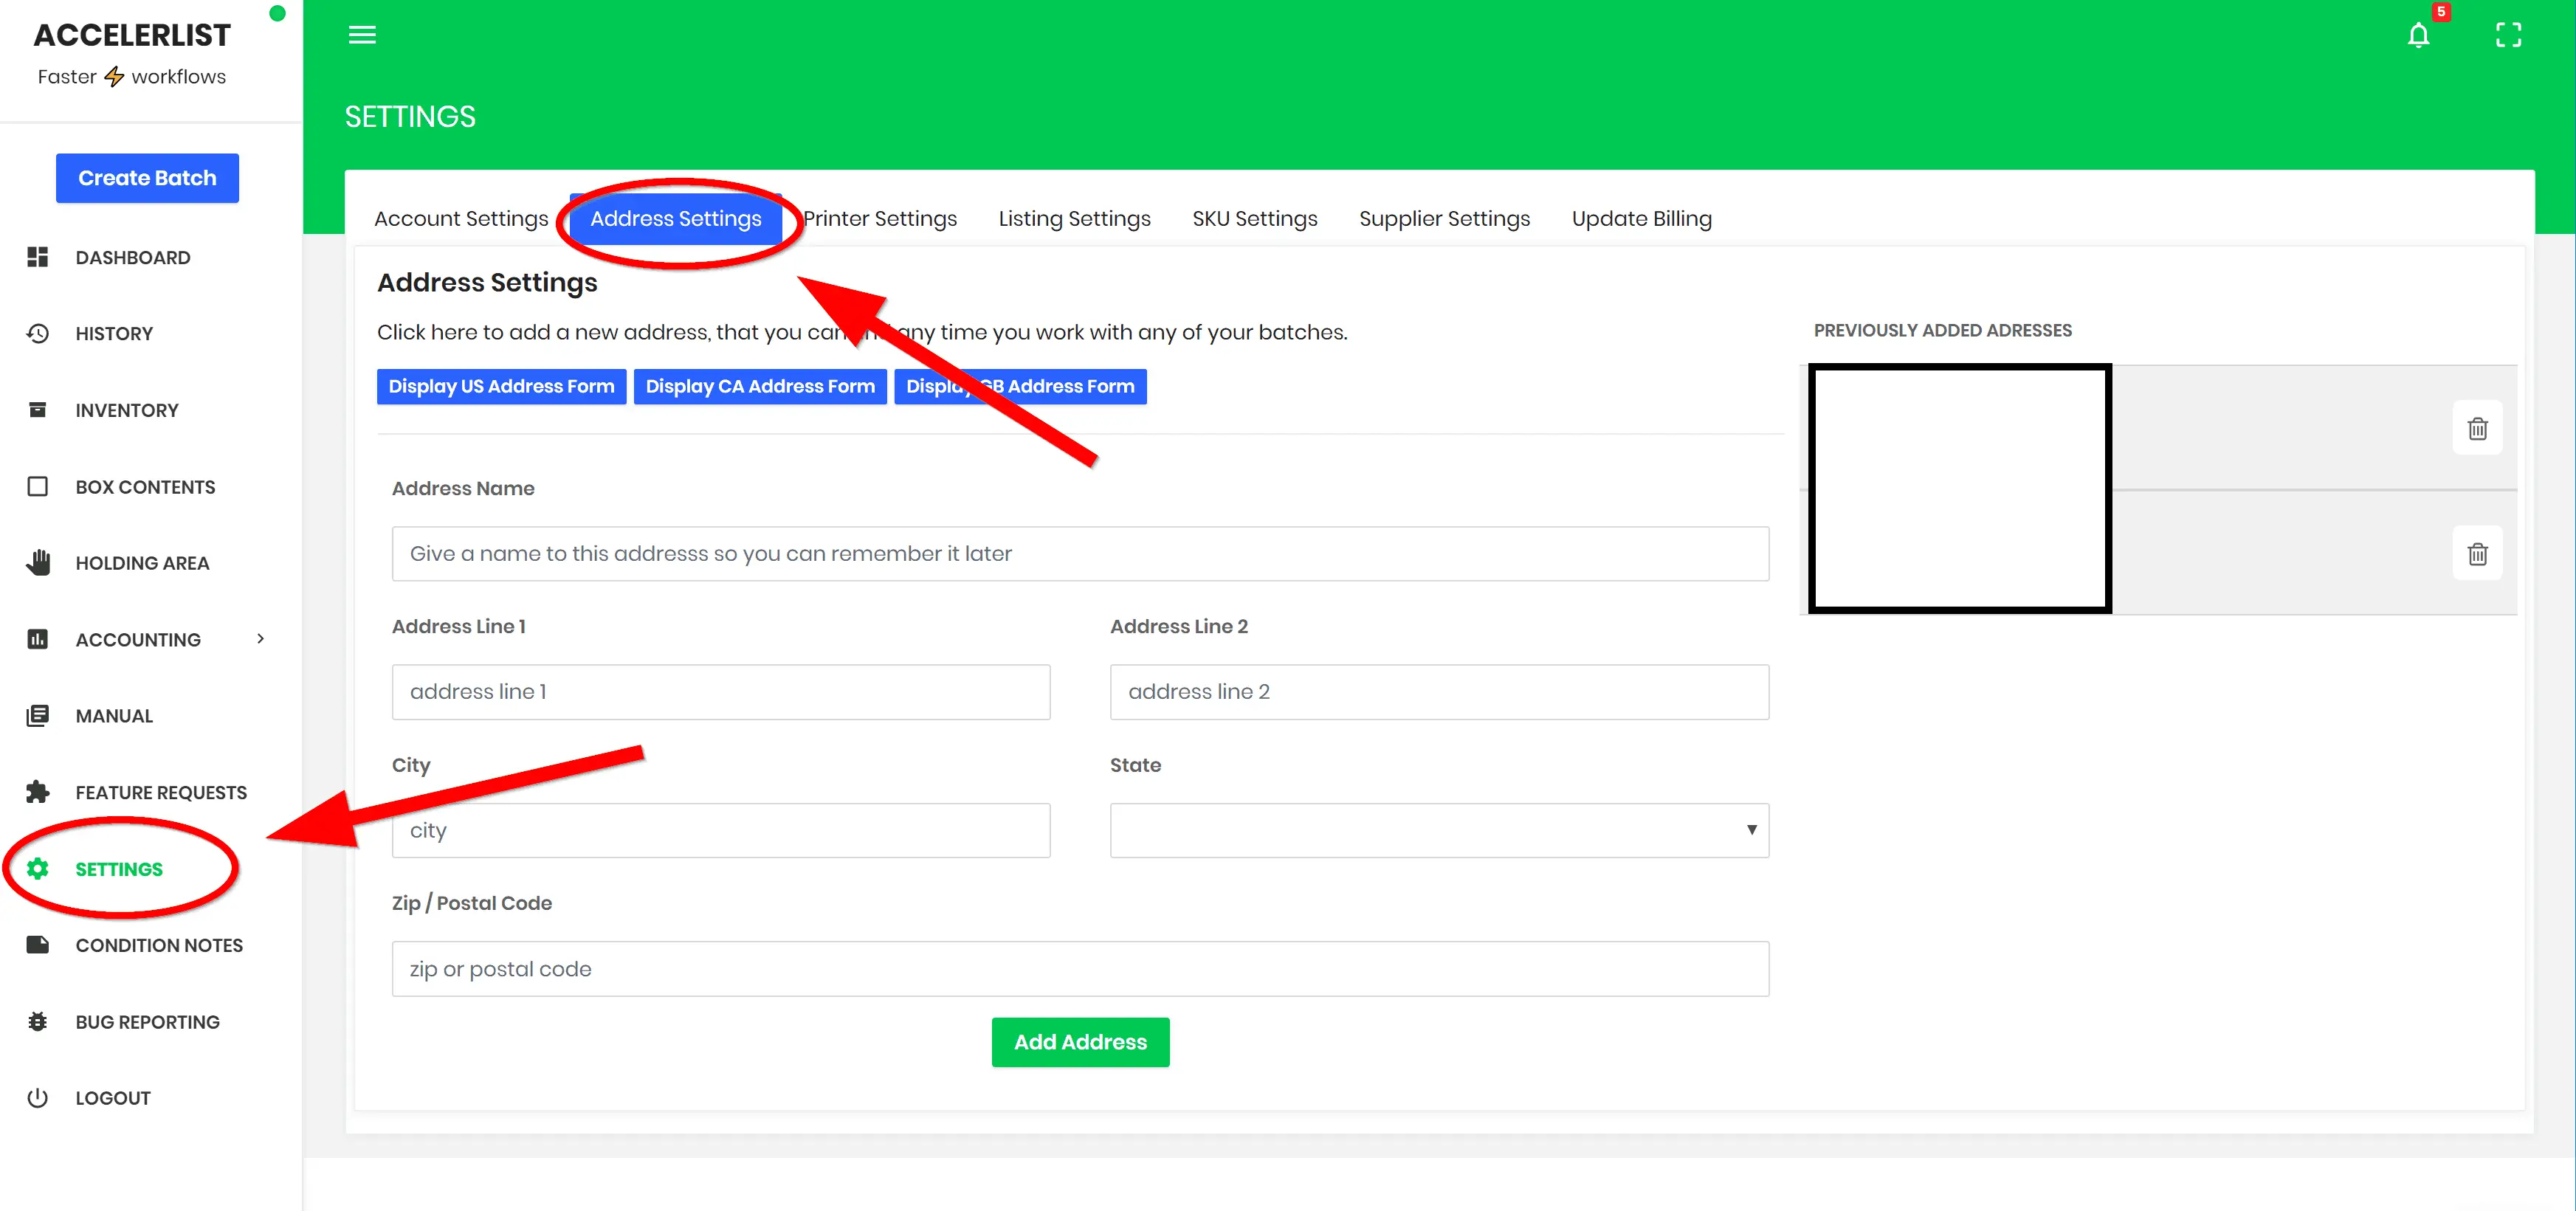
Once your four condition notes have been added, you need to add your address to Accelerlist (so Amazon knows where you’re shipping your books from).
Go to Settings on the left sidebar, and then click the Address Settings tab. Once there, fill in your address information and click “Add Address”.
Now that your address has been set, it’s time to install the printer.
Click on Printer Settings, which should be next to Address Settings.
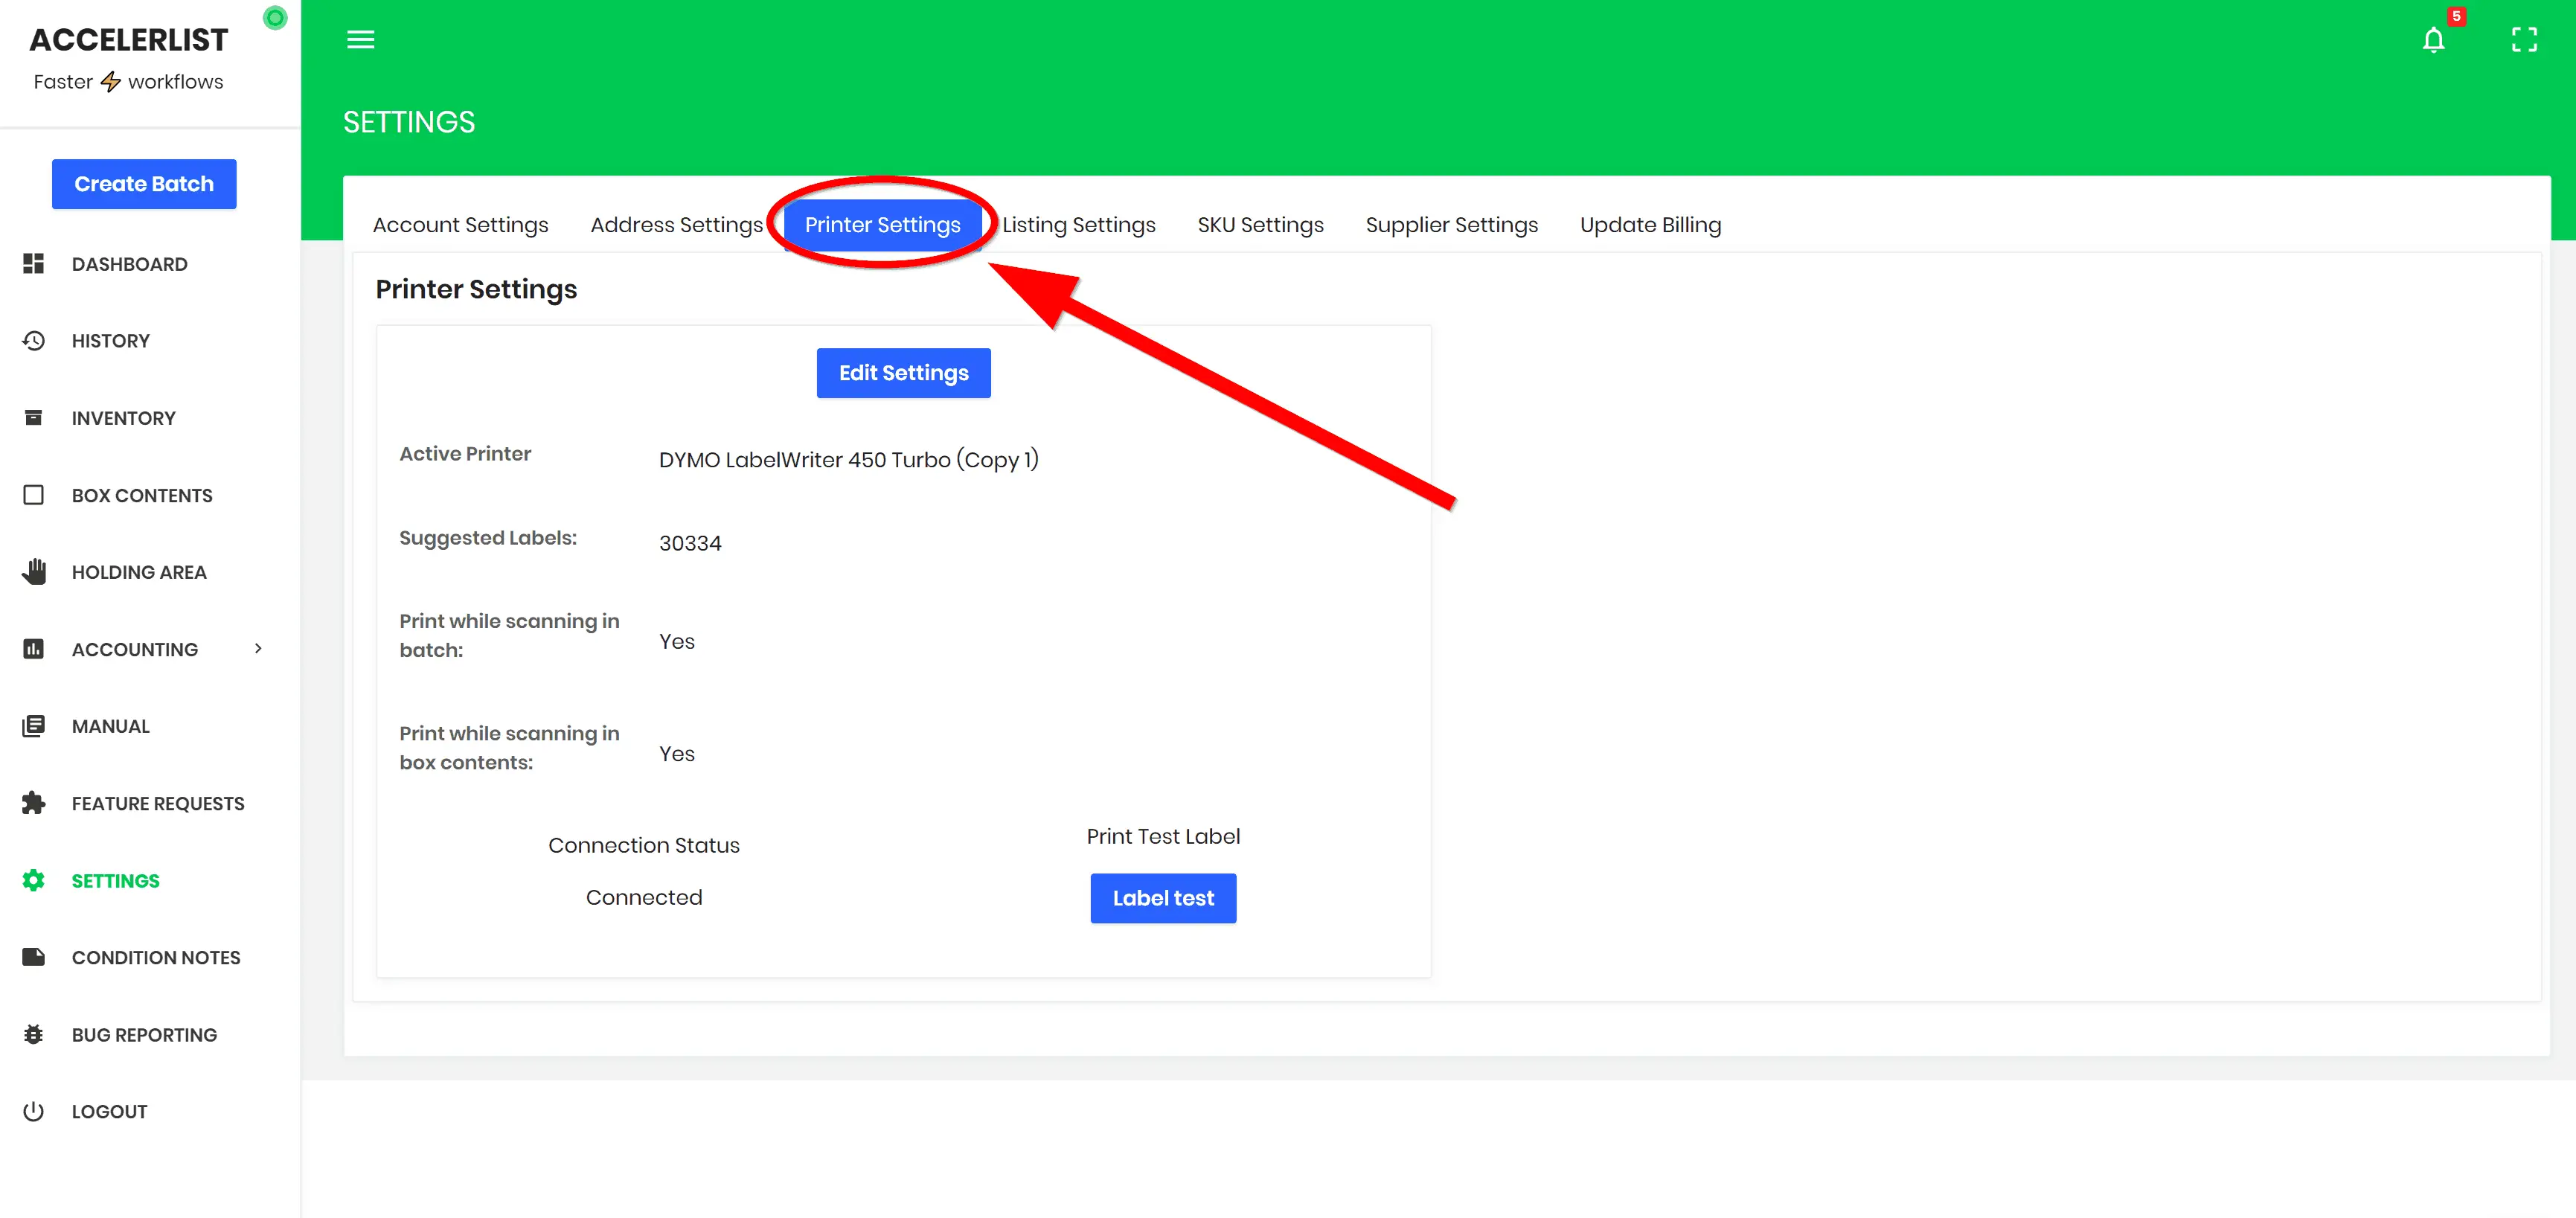
I’m not sure how to uninstall my printer from Accelerlist, so I don’t know what the printer installation screen will look like for you. It should be pretty straightforward though, Accelerlist holds your hand during all of the setup phases.
After making sure your printer is plugged in to your computer and power outlet, follow the prompt and select the proper printer manufacturer and label size. If you purchased my recommended printer and labels, you should have a Dymo printer with type 30334 labels.
After the installation is complete, click “Label test” to make sure everything went smoothly.
Once the printer has been installed, click on the “Create Batch” button in the top left corner.
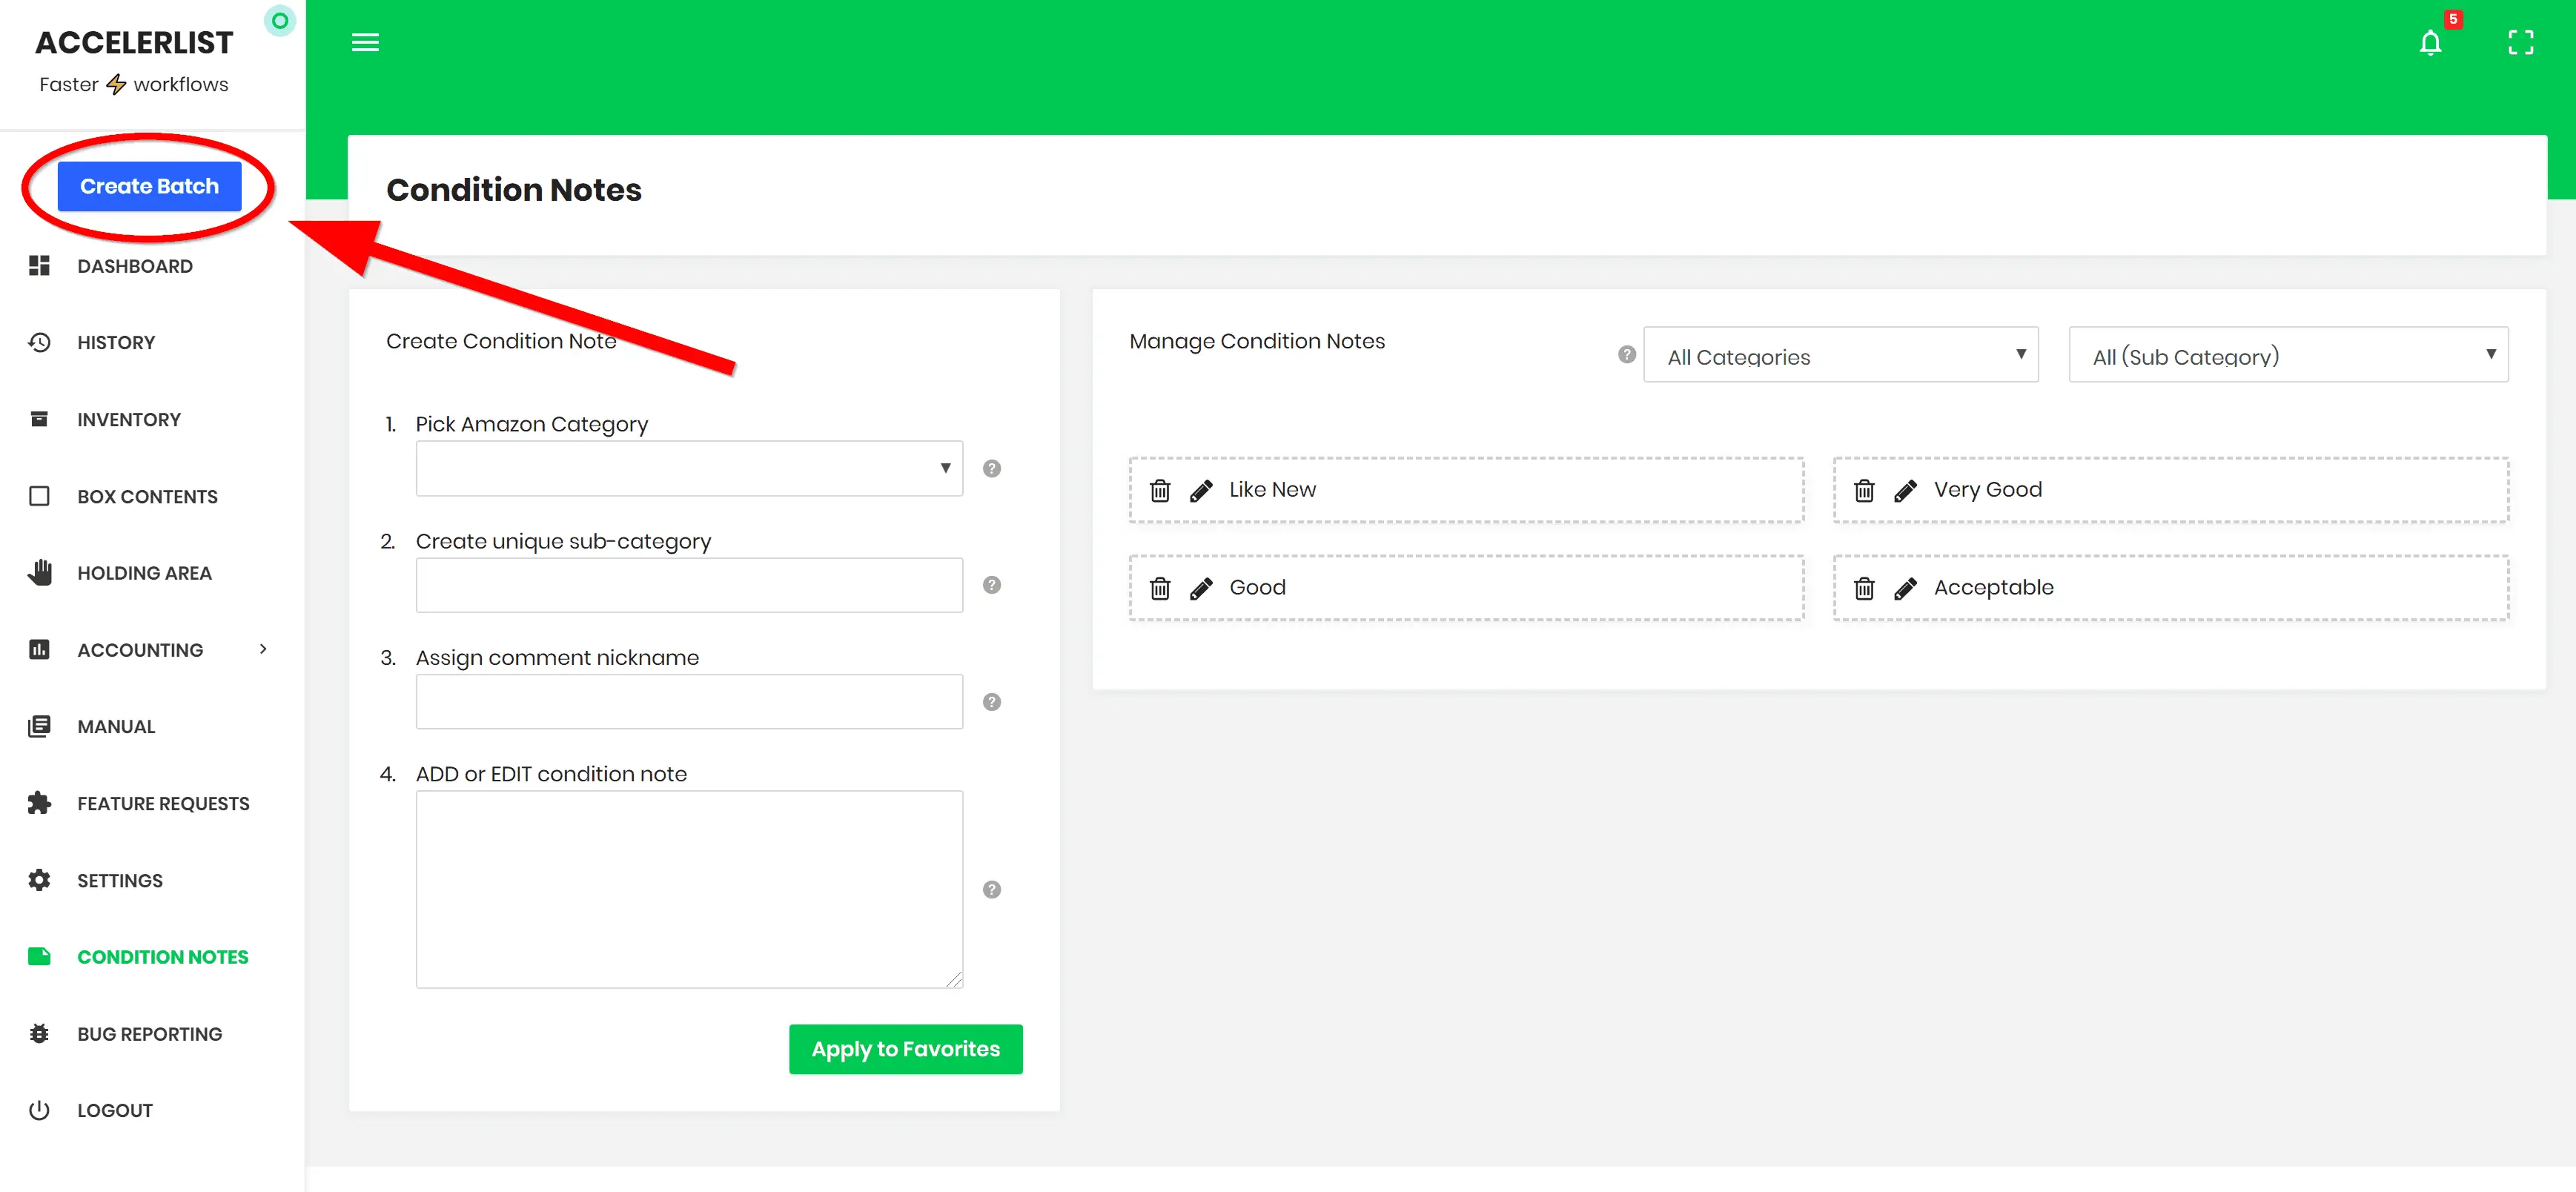
When you click this, the Create a New Batch box will appear.
There are a few batch parameters you need to set here. Here’s how I recommend setting them:
- Batch name: Name it whatever you want. It doesn’t matter.
- Use Custom Template SKU?: I don’t use a custom template SKU, but you’re free to do so.
- SKU Prefix: I set my default SKU prefix to be the date I’m listing the products. So if I was listing some books today (May 22, 2019), I would type “05_22_2019” into the SKU prefix field.
- Shipping from: Choose the address you set a few steps ago.
- Channel: FBA
- Labeling Preference: Seller Labels
- Workflow Type: Live
Once the batch is created, you’re all set with Accelerlist. Leave it for now, we’ll come back to it in a bit.
Step 4: Sort your books by condition (and remove flaws).
After your listing software is configured, you’re going to want to sort your books into separate piles by condition. If you don’t know how to grade your books, here are Amazon’s guidelines:
New: A brand-new copy with cover and original protective wrapping intact. Books with markings of any kind on the cover or pages, books marked as “Bargain” or “Remainder,” or with any other labels attached may not be listed as New condition.
Used – Like New: Item may have minor cosmetic defects (such as marks, wears, cuts, bends, or crushes) on the cover, spine, pages, or dust cover. Dust cover is intact and pages are clean and not marred by notes. Item may contain remainder marks on outside edges. Item may be missing bundled media.
Used – Very Good: Item may have minor cosmetic defects (such as marks, wears, cuts, bends, or crushes) on the cover, spine, pages, or dust cover. Shrink wrap, dust covers, or boxed set case may be missing. Item may contain remainder marks on outside edges, which should be noted in listing comments. Item may be missing bundled media.
Used – Good: All pages and cover are intact (including the dust cover, if applicable). Spine may show signs of wear. Pages may include limited notes and highlighting. May include “From the library of” labels. Shrink wrap, dust covers, or boxed set case may be missing. Item may be missing bundled media.
Used – Acceptable: All pages and the cover are intact, but shrink wrap, dust covers, or boxed set case may be missing. Pages may include limited notes, highlighting, or minor water damage but the text is readable. Item may be missing bundled media.
Unacceptable: Has missing pages and obscured or unreadable text. We also do not permit the sale of advance reading copies, including uncorrected proofs, of in-print or not-yet-published books.
You could grade your books as you list them ‒ I used to do this when I first started.
However, I’ve since switched to grading and sorting my books before I list them.
There are a few reasons for this.
First, it streamlines the whole FBA book preparation process.
By breaking one complex task (grading while listing) into two simpler tasks (grading and then listing), you make the whole process smoother by lowering the potential for frustration and mistakes.
It makes the process more mechanical and less mentally taxing, which makes it easier to “get into the zone” and finish the job without stopping for breaks.
Second, it’s faster.
With Accelerlist, you can set a default condition and description for the items you’re scanning in.
If every item you scan in matches that condition and description, all you have to do is set the price and hit submit.
By sorting your books by condition ahead of time, you can ensure every book you scan in matches whatever condition and description you set as the default.
This way you only need to change the condition and description four times (once for Acceptable, Good, Very Good, and Like New) instead of changing it every single time you list a book.
Be extremely thorough in this step. Your feedback (and therefore your ability to sell on Amazon) depends on you accurately grading your used books.
I also suggest taking an “under-promise and over-deliver” approach to grading your books.
If you’re on the border between rating a book as Good and Very Good, rate it Good. This will have two positive effects:
- It will give you a boost in positive feedback. When buyers expect a book in Good condition but receive a book in Very Good condition, they will be happily surprised. When you ask them to leave you feedback, they will be more likely to help you out, and the feedback they do leave is more likely to be positive.
- Picky buyers will be less likely to leave negative feedback. I’ve sold a few books that were technically in Very Good condition according to Amazon’s guidelines, but I received neutral or negative feedback from buyers who were upset at the overall wear the books showed.
While you’re sorting, you should also be removing any fixable flaws you see. There are a number of potential issues you have the ability to rectify:
- Clean dusty/dirty covers with Clorox wipes
- Erase any penciled-in price information with an eraser
- Remove stickers with price information with a label remover
- Remove any bookmarks or post-it notes from the books
- Straighten dog-eared page corners
I know that all of these extra steps might seem like an unnecessary waste of time.
Just remember that your primary goal in building this business is long-term success ‒ and a major part of that is maintaining the highest possible feedback rating.
All of these little efforts to improve the quality of your books will show in your feedback ratings.
You’ll stand out among the other booksellers who don’t take the time to properly clean and “de-flaw” their books, and the people buying your books will appreciate that.
Step 5: List your books.
Now that everything is set up and your books are sorted, you can actually start to list your books on Amazon.
Because you’ve already sorted your books by condition, your job has been made considerably simpler.
Here’s my step-by-step process for listing pre-sorted books:
- Choose a pile to start with. I usually start with Like New and work my way down.
- If you’ve navigated away from the Accelerlist batch page, click on “History” in the left sidebar and then click on your batch.
- Select the default condition and condition note in the “Notes” tab on the right sidebar. You should have already input these default condition notes in step 3.
- Scan the first book’s barcode with your USB scanner. If the book doesn’t have a barcode, type in the ISBN number. If the book doesn’t have either, type in the title. The book’s listing should now come up on Accelerlist.
- Set your initial price. Unless the item is a textbook, I usually just click on the lowest FBA offer to speed things up (unless that offer is significantly lower than the other FBA offers).
- If the item is a textbook, add a special SKU prefix that indicates it’s a textbook. I add “TX” to the beginning of my textbook SKUs.
- Click “Add to batch.”
- Place the book in a “finished” pile to the side. You’re not going to be placing books into boxes yet. That will come in the next step.
- Repeat steps 4 through 7 until you’re done with your first pile.
- Move on to the next pile. Make sure you change your default condition and default note in the Accelerlist sidebar to match your new pile.
Note: If you’re listing a set of books, an older book with a fragile cover, or an open-box audiobook, you should package it in a polybag. If the item is too big for a polybag, I find saran wrap and shipping tape make for a perfectly acceptable replacement.
Step 6: Submit your shipment information and affix the shipping labels to the boxes.
Once everything is listed and packed, you can submit your box content information and close out of Accelerlist.
Now it’s time to deal with the box content information.
If your shipment only consists of one box, you won’t have to worry about this step. Go ahead and load up your single box.
If you’re sending two or more boxes, you’ll need to take some extra steps to make sure Amazon receives your box content information.
First, you’ll need to enable 2D box content labels in your Amazon Seller account.
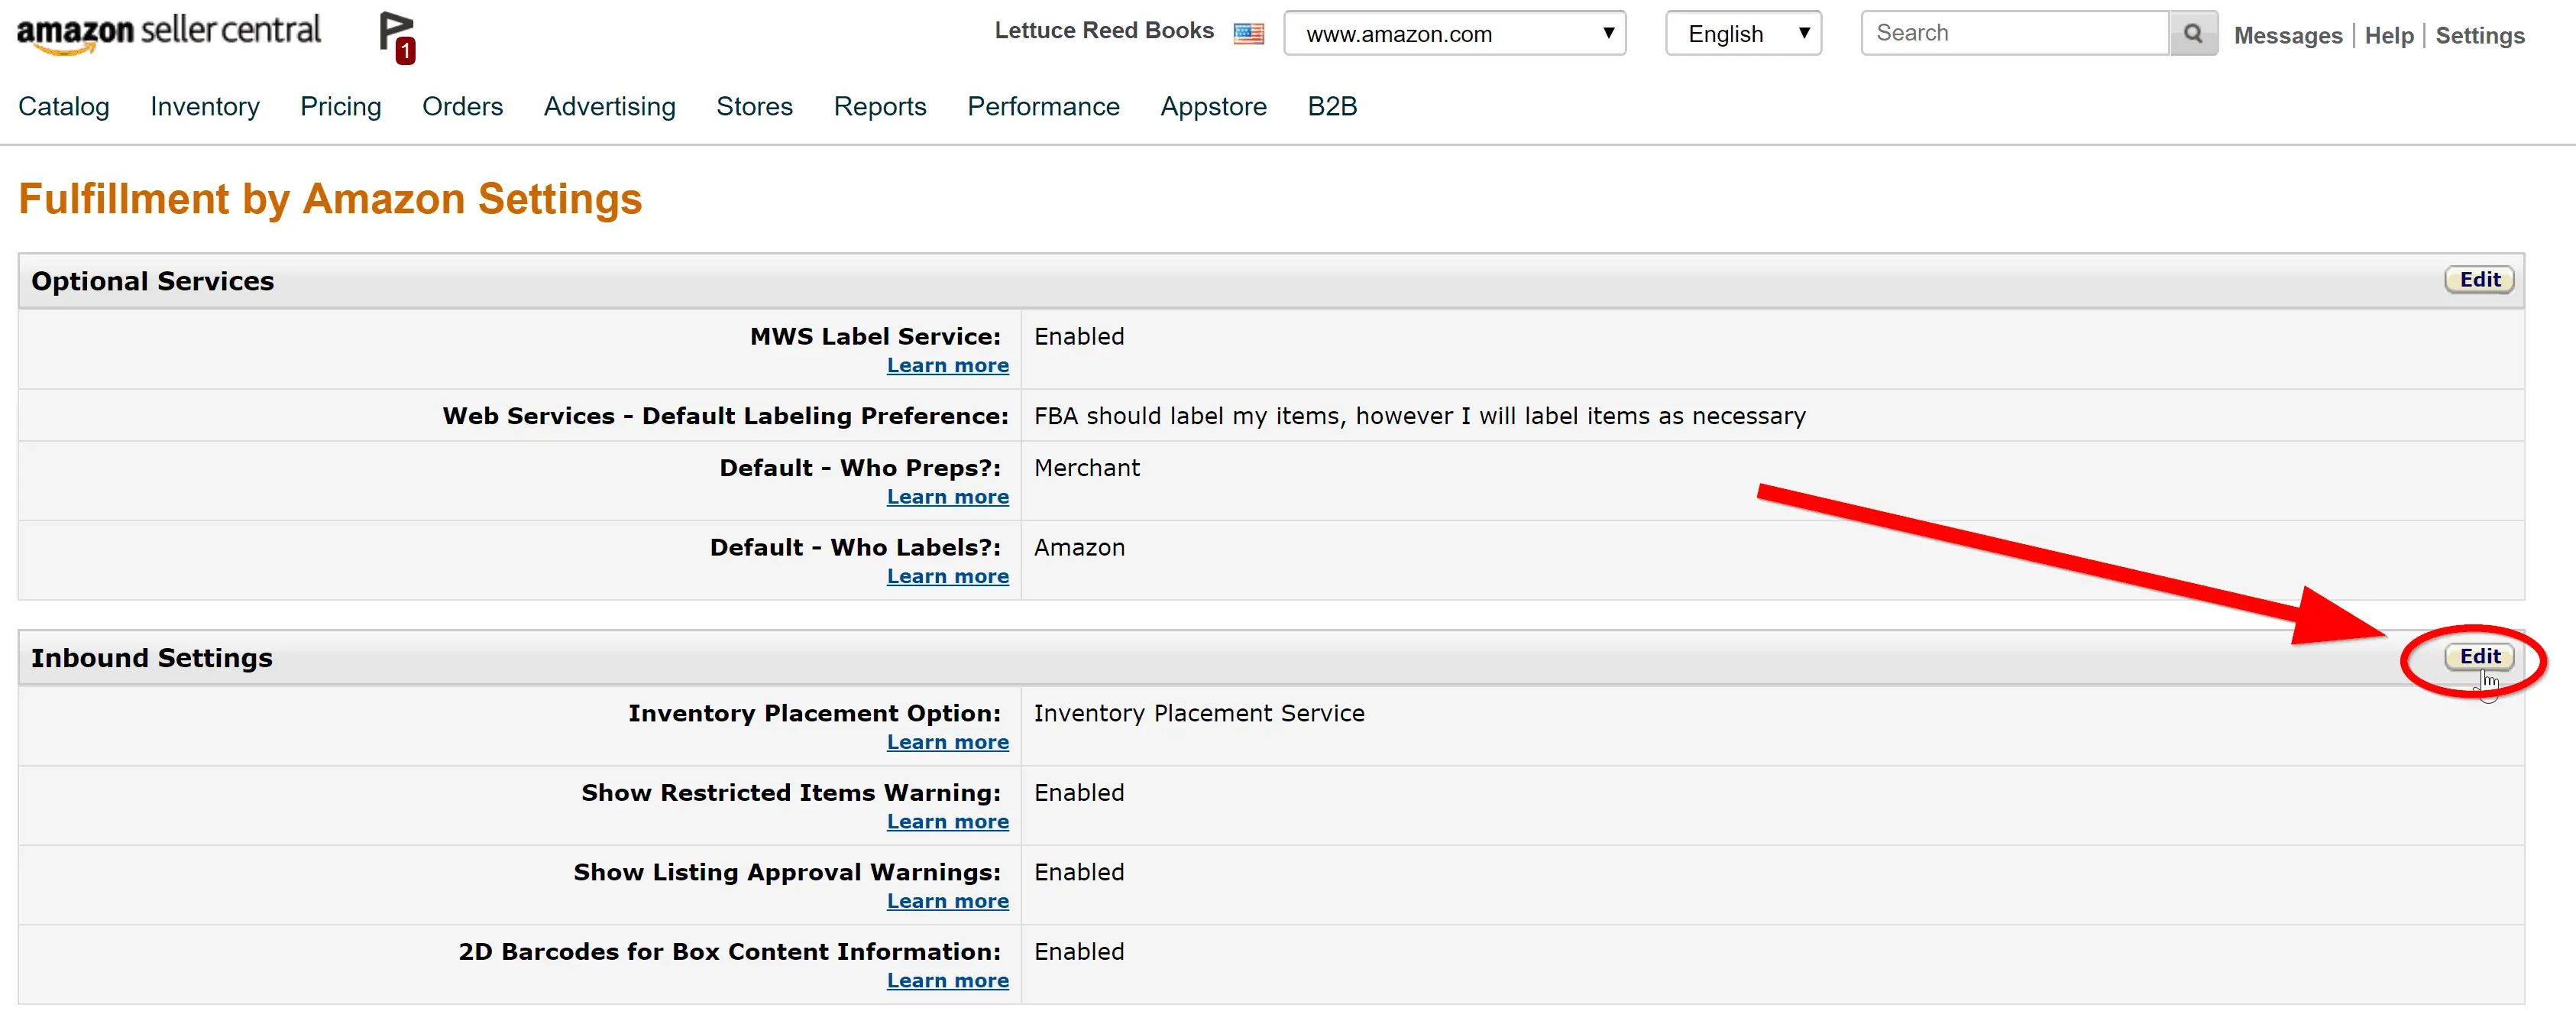
Go to the “Fulfillment by Amazon” page in your Settings dropdown menu.
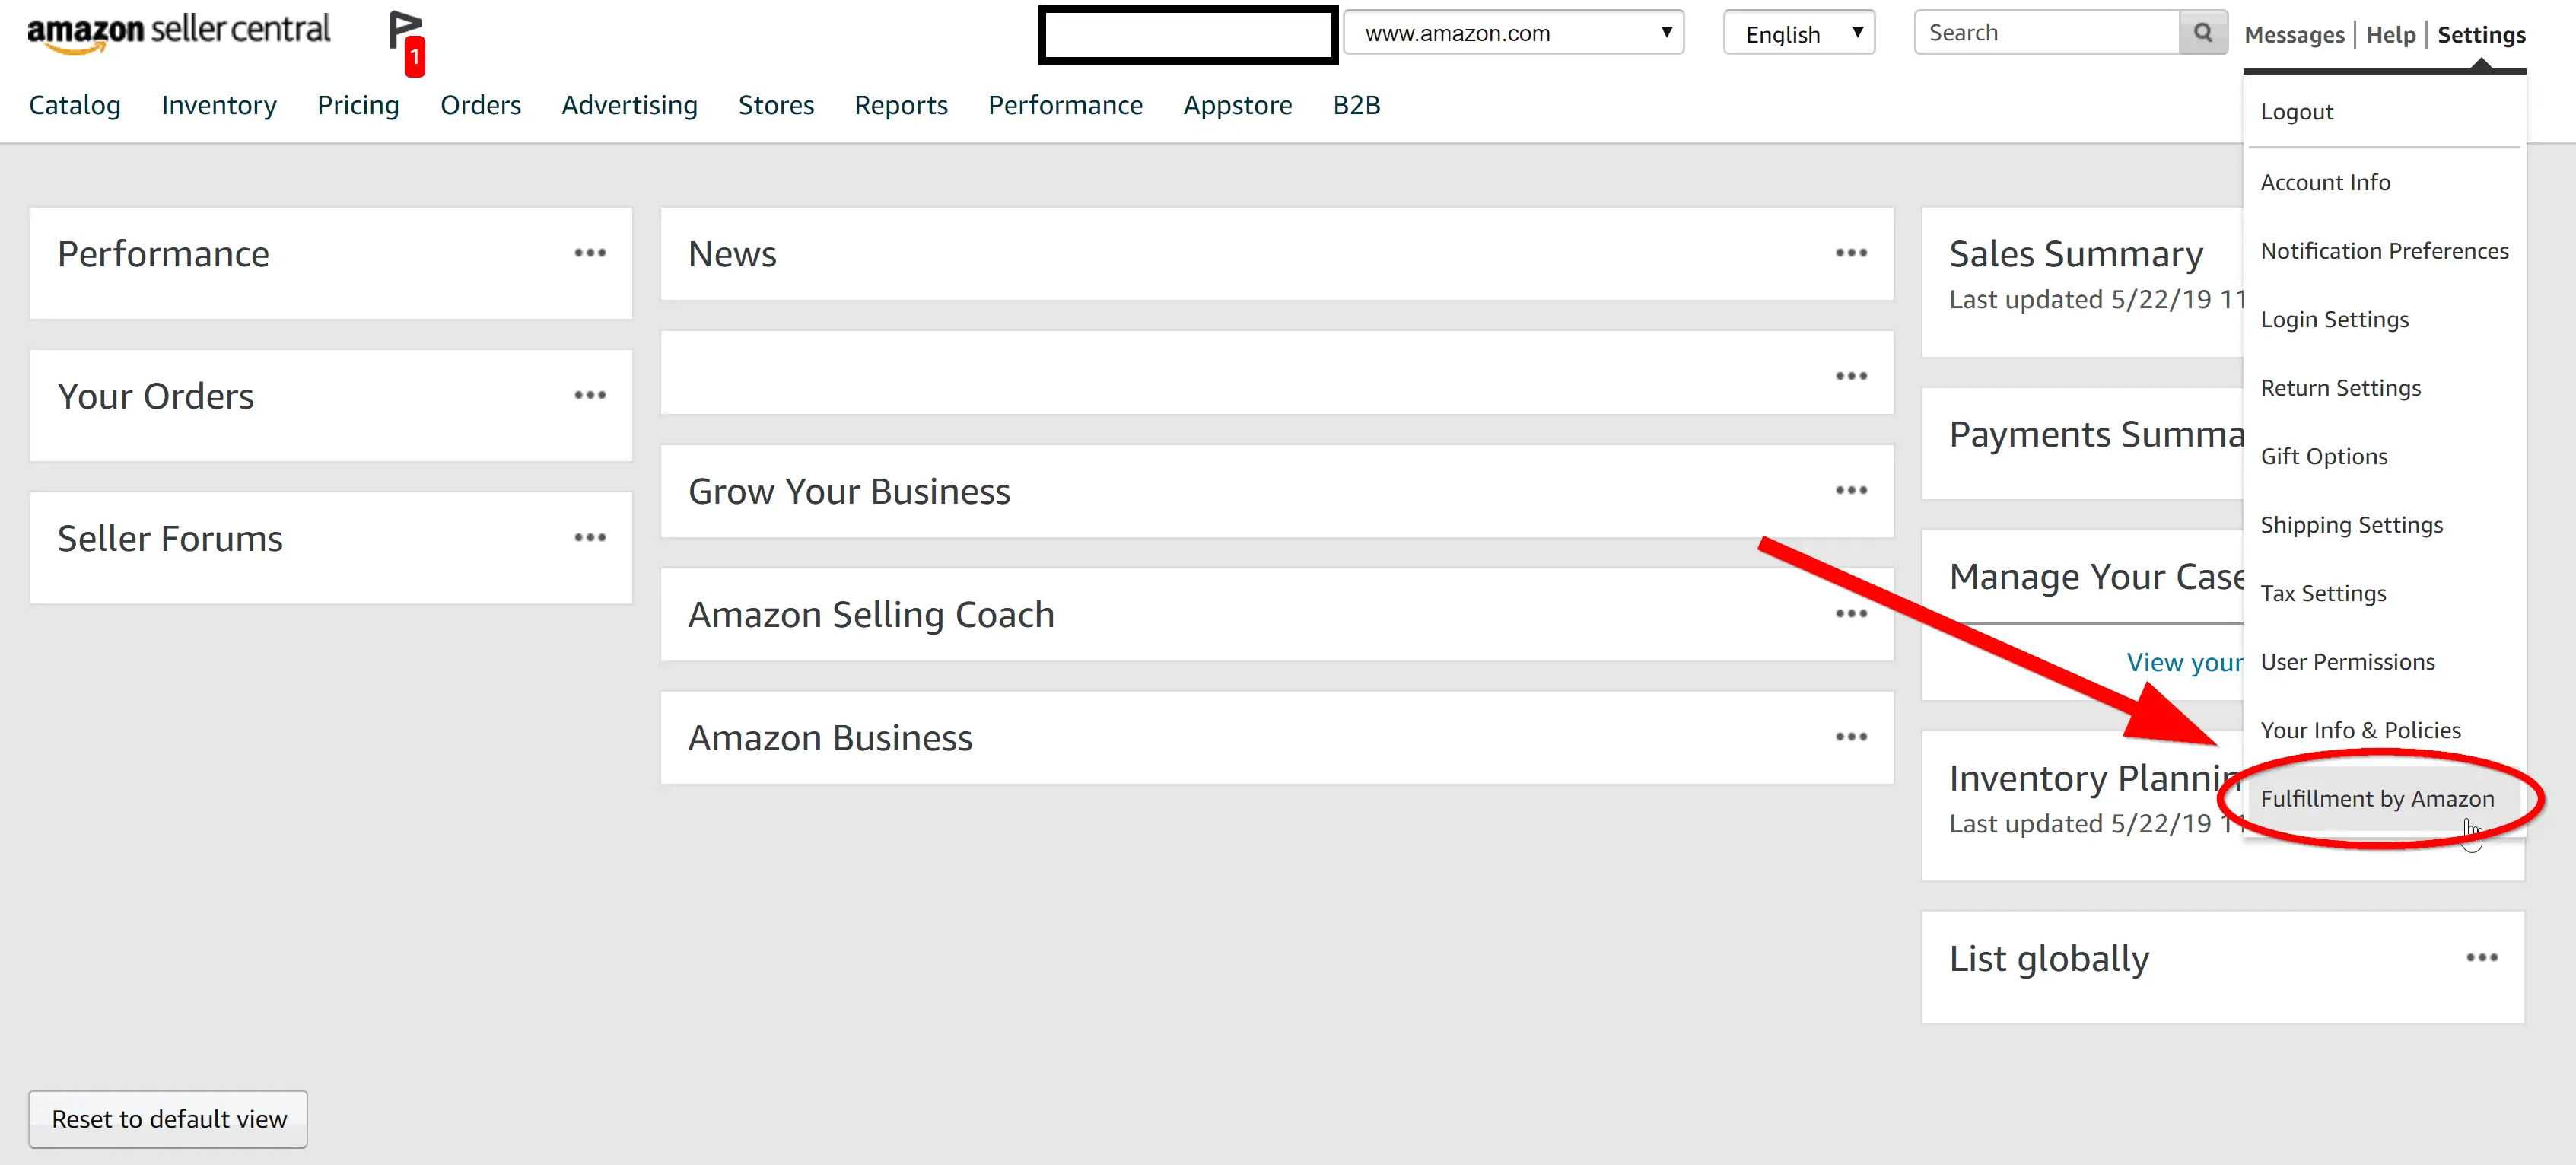
Once you’re there, click “edit” in the Inbound Settings box.
Second, go to FBABoxContent.com. This website is part of Accelerlist, though it’s on a different domain. You’ll need to create a new account using the same email address you signed up for Accelerlist with. It might say you need to pay a monthly fee for access, just ignore that. Accelerlist subscribers get free lifetime access to this box content service.
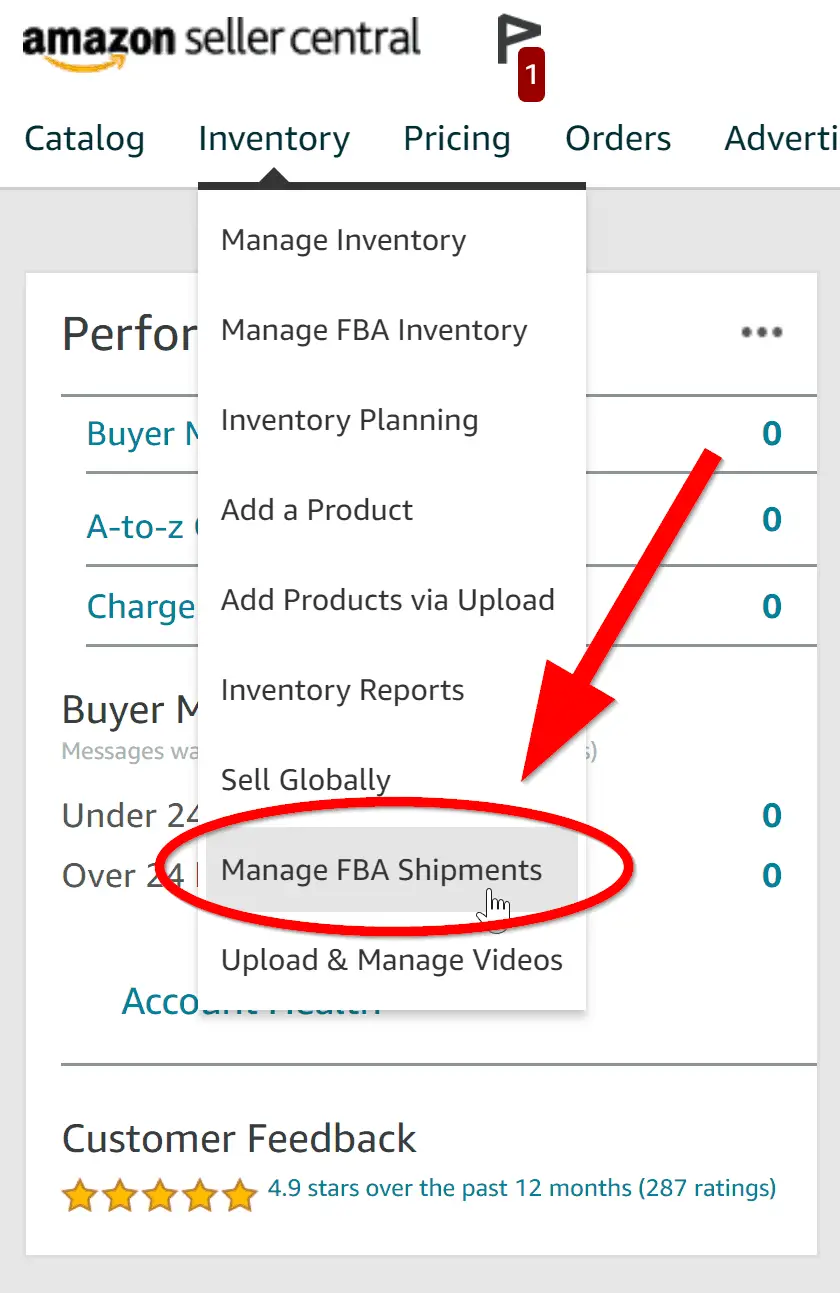
Head over to Seller Central. In the Inventory dropdown menu, click the Manage FBA Shipments button.
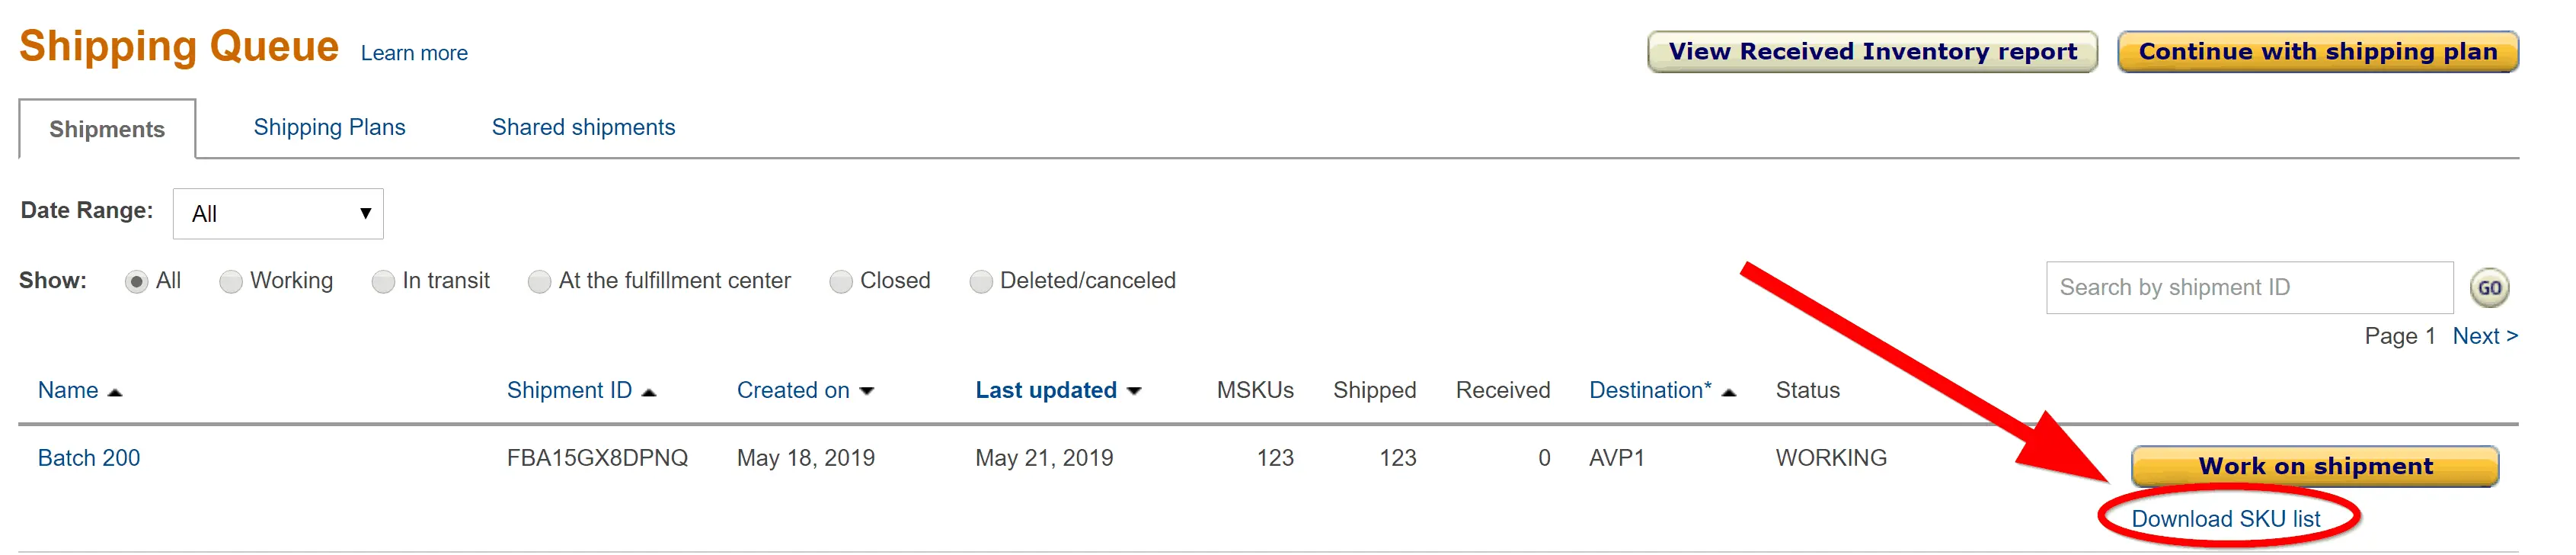
If you successfully submitted your batch information on Accelerlist, your shipment should be at the top of the list. Click on “Download SKU list” below the yellow Work on Shipment button.
Take the downloaded .tsv file and upload it to FBABoxContent.com.
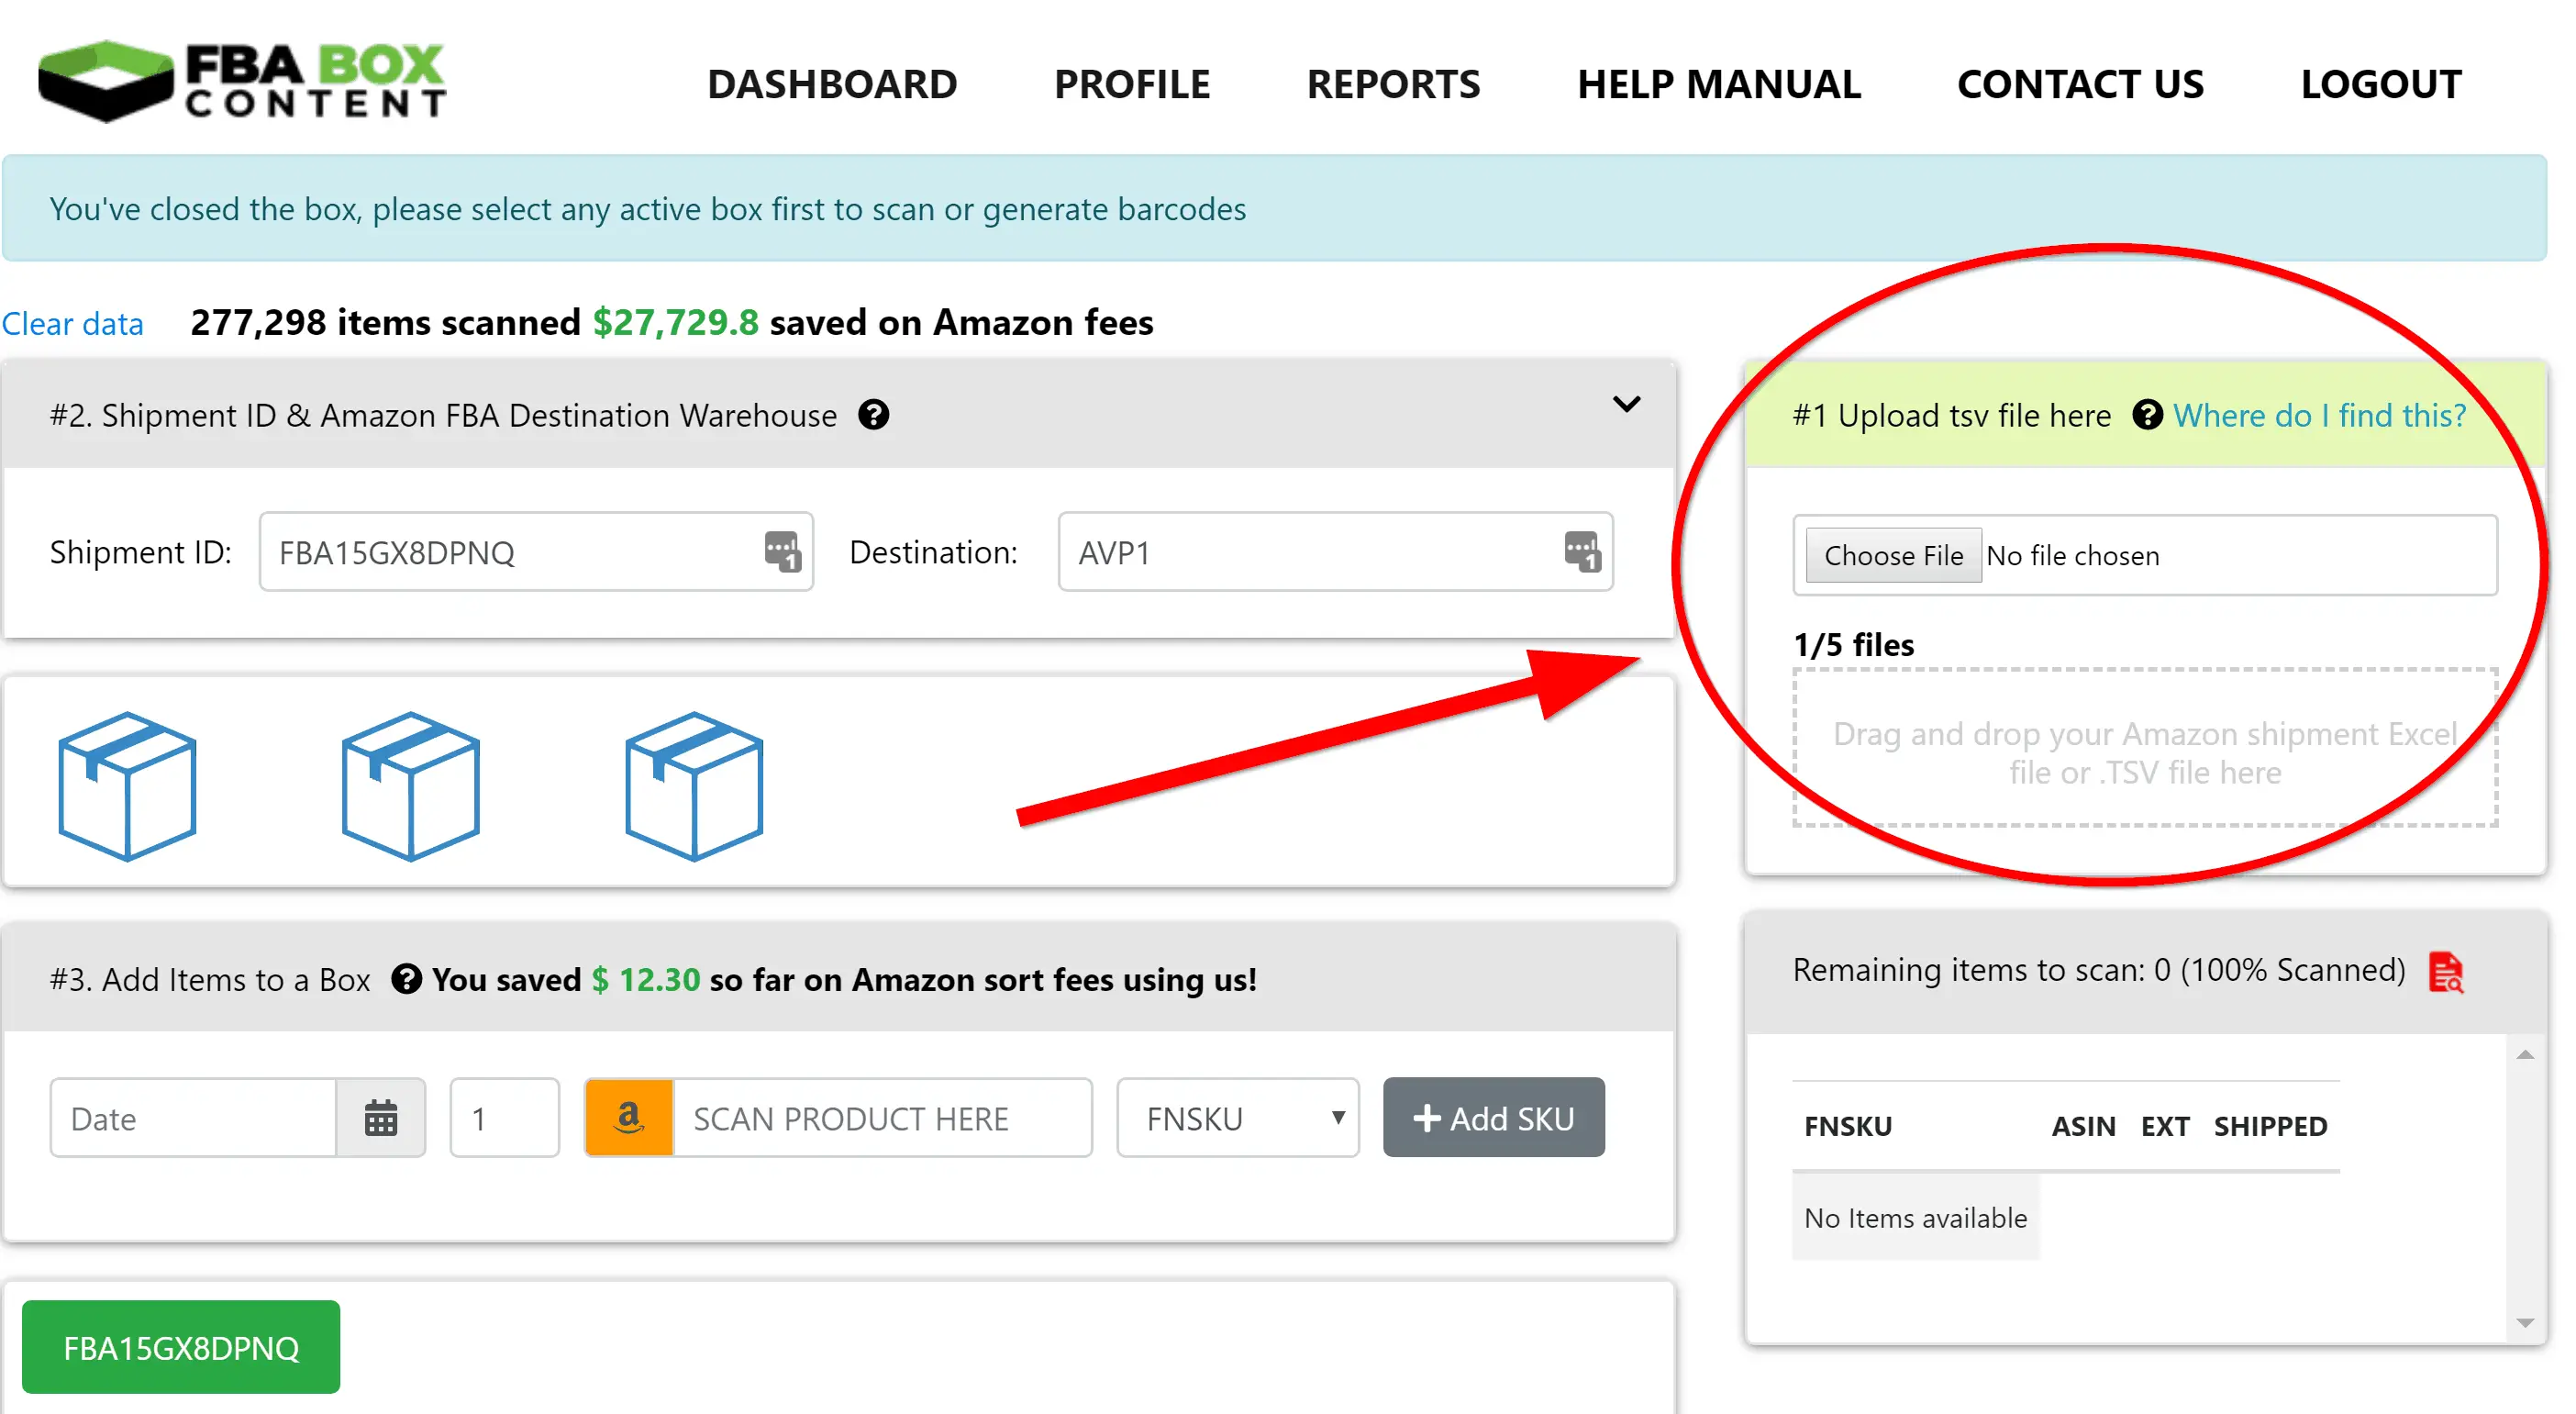
Once the .tsv file is uploaded, you can start putting your books into boxes. Here’s the step-by-step process:
- Pick up a book.
- Scan it into FBABoxContent using the Amazon barcode you affixed earlier.
- Place it in a box.
- Repeat steps 1 – 3 until the box is filled.
- Tape the box closed.
- Weigh the box with your shipping scale.
- Write the weight and box number on the top of the box.
- Click “New Box” in FBABoxContent.
- Start scanning books into the second box.
- Repeat until all of your books have been scanned into FBABoxContent and placed in boxes.
Now that all of your books have been assigned to a box, you should print your 2D barcodes from the FBABoxContent page. You should then head back over to Manage FBA Shipments in Seller Central. Once there, you can select your shipment, set your box weights, and print your shipping labels.
When you affix your labels and 2D barcodes to your boxes, make sure you don’t cover the space between the flaps with the paper. When your shipment arrives at an FBA warehouse, the employees will have to open the box. If your shipping label gets in the way of them opening the box, they’ll have to cut the label in half.
This could delay your books going up for sale on Amazon, because the shipping label also contains an FBA barcode that the warehouse employees use to process your shipment. If they have to damage that label to open your box, it might take them longer to deal with your books.
Step 7: Send your boxes to Amazon.
Now that everything is packed and the shipping labels and 2D barcodes are on the boxes, it’s time to get them to UPS.
The easiest way to do this is to have UPS pick the packages up from your house. Depending on where you live, it costs between $7 and $11 for a pickup.
Unless you live next door to a UPS store, I highly recommend taking advantage of this. It’s incredibly convenient ‒ no need to lug all the heavy boxes into your car, drive to UPS, and carry them all inside. It’ll also save your back from some unnecessary heavy lifting.
You can schedule a pickup by going to the UPS website, making an account, and scheduling an internet pickup.
Step 8: Relax.
Once the boxes are with UPS, your work is essentially done.
Aside from a bit of repricing, you won’t have to think about these books ever again. Amazon will handle everything else from here ‒ you get to sit back and watch the sales roll in.